|
Tim is an experienced ceramic artist doing a residency within the MA Ceramics Department, he delivered a presentation to us where he talked about his creative career, his journey into ceramics and the things he was working on at the moment, he then gave us a brief demo of some of the processes he uses to make his pieces. I also interviewed Tim one to one as research for my written assignment, Research in Context. I find Tim’s work really interesting, he embraces chance and happy accidents in the pieces he makes and he is really interested in the materiality of clay, he refers to his pieces loosely as vessels, but does not consider functionality as their core purpose. Tim uses a wood burning kiln that he built when firing his work at his studio in Yorkshire, he also teaches ceramics at The Sculpture Lounge in Holmfirth. I was particularly interested in Tim’s process for creating the larger inclusions he has in his pieces, like the Tokura jar, so I was really pleased to see a demo of one of the ways he did this. I had been looking a way of building up the surfaces of a moon jar I had recently made in black clay and wasn’t sure where to go with it. I am inspired by the complex surface textures of Akiko Hirai’s work so was looking at ways to reference some of this in my own surfaces and felt that Tim’s approach could be one way to try and add some thick three dimensional surface texture to the pot. Below is Tim showing us some of his making processes. Following this session I dried some black clay body out on top of the kiln until it was hard enough to break up into shards using a rolling pin. I then pushed these dried pieces into the top area of the coiled moon jar I had made from heavily grogged black stoneware clay body. I then added white porcelain slip and extruded porcelain texture that I had achieved by pushing porcelain through a sieve. I wanted to use some white slip as I was aware from previous glazing experience that due to the very high levels of Manganese present in black clay, it can be very difficult to see any coloured glazes over black clay. Below is the moon jar after bisque with the white slip and extrusions. I chose to use a more limited palette of glaze colours for this piece, I was hoping if it fired successfully to use this as one of the pieces in my visions of landscape exhibition. I used Titanium White, dark blue and pale green glazes and fired the piece in oxidation. Below are images of the finished piece. Overall I was really pleased with the outcome of this piece, I was hooping that I would achieve a surface finish that was reminiscent of water in the landscape and I think this work evokes the textures and colours observed in such things as lakes and rivers, coastal landscapes and rock pools. This piece will be going to the Visions of Landscape Exhibition in April 2023.
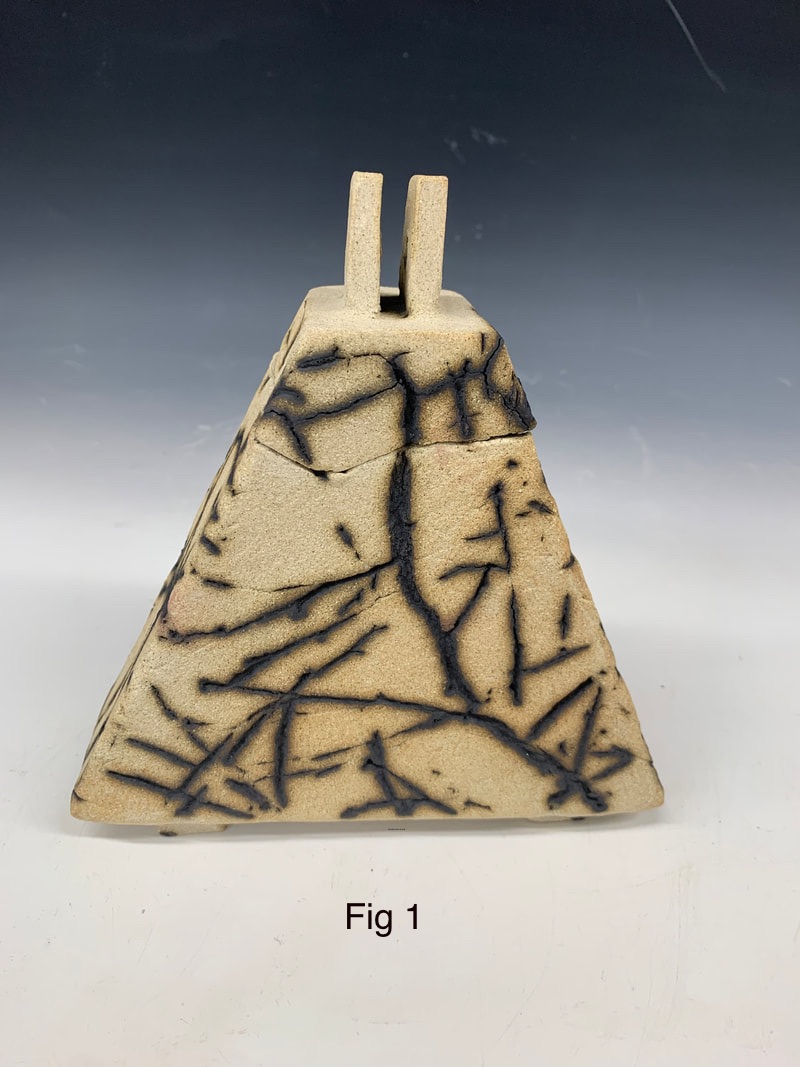
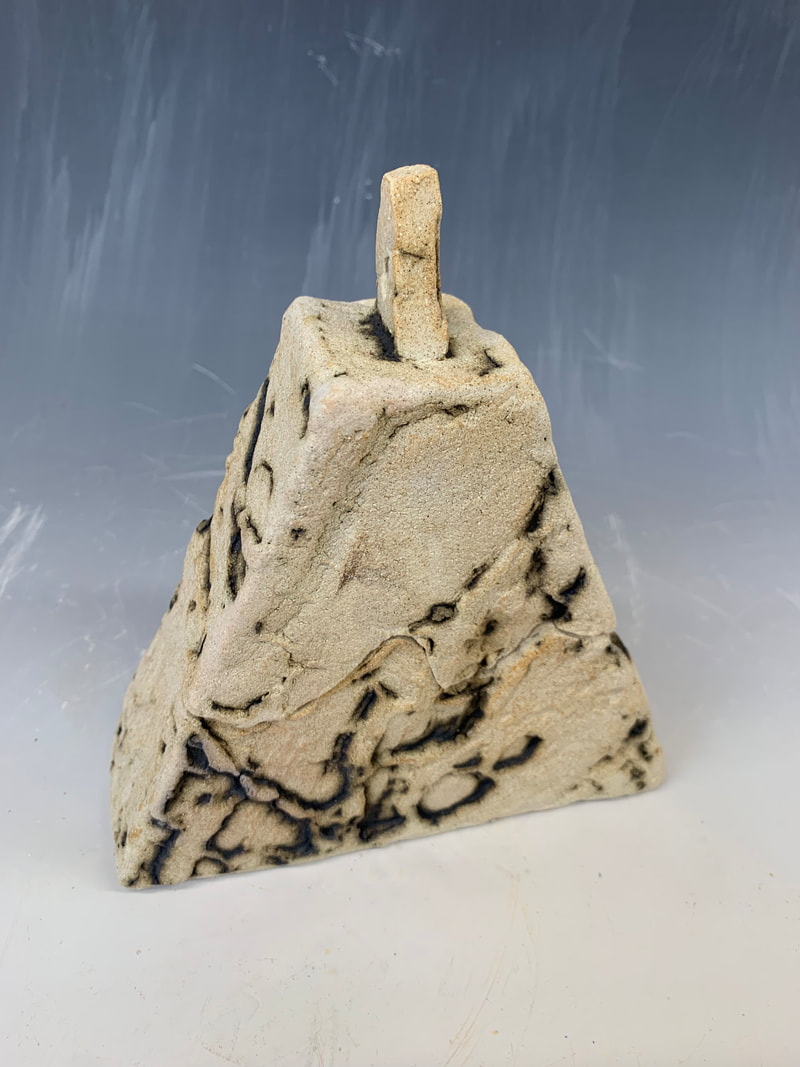
My pair of boxes are designed to hold small pebbles and a poem, both of these items are connected to my lovely step-son Chris who died very suddenly and unexpectedly at the age of 26. The poem is called The Holstee Manifesto and the pebbles were part of the service we had to celebrate his life. Chris was a very keen climber and loved nothing more than to be outdoors, he had travelled and lived extensively around the world and was a true adventurer. One of his very favourite places to go was Malham Cove, a huge limestone cliff face (referred to as an amphitheatre because of its curving shape), located in North Yorkshire. Malham is a very special place to us, we sprinkled Chris’s ashes there and regularly visit this stunning limestone landscape, climbing up to look out across the valley and beyond from the rugged limestone pavement. I have created a number of sketches, and included text and images in my sketch book showing how I researched and developed the initial idea for this project. Please refer to my large A3 sketchbook for more information on the early research. Below are the images I took documenting the making process using the slab building technique, I did several explorations in developing texture on the surface which I will add below. I wanted to create a surface to the slabs that evoked memories of the deep fissures and undulating surfaces seen ion the limestone pavement at Malham. I wasn’t trying to make a replica of it, just something that referenced this landscape. I was exploring textures for both the top limestone pavement as well as the cliff face as you look up at the cove from below. Building on what I had already done with texture at the start of the MA, I added dry and wet clay together, scratched, scored and marked clay then dried it out and stretched it, then ran wet and dry clay together through a slab roller. All of these processes created interesting textures, but the challenge I had was how thick the slabs ended up being and how easily the clay cracked so I had to revise the textured surface several times before I settled on two I thought worked well. I experimented with cutting the surface of the clay using a clay harp to create striations similar to the cliff face and tried this on a taller vessel first to see how it would look. Below are images of this vessel. Initially I wanted to make a curved shaped box like the amphitheatre shape of the cove itself, but Rob proposed a new idea. To use a more abstract approach and take a section of the cliff as if you were looking up from the bottom, and create a pyramid type slice of the cove. I wasn’t sure about this so decided to play around with some little macquettes in clay to see how this would look. I consulted with fellow students and had a think about the overall aesthetic of the piece and chose the two pyramid shaped sections, they just felt like they would be more interesting and as a pair of boxes would sit better together. I used Ashraf Hanna stoneware clay body which I attempted to stain by blending in a black clay, this didn’t work and made no difference to the colour of the clay at the end. Below are images of the construction of the boxes, I wanted the lids to be hidden, so there would be no obvious join so I chose to follow the lines of the surface patterns to disguise where the lid came away from the box. I also wanted to use feet on the boxes, but because of instability issues this wasn’t achievable on one of the boxes. The knob on the top of the box is designed in such a way that some paracord or carabina can be threaded through the holes. This was designed to be inkeeping with Chris’s love of climbing. What went wrong :-
I had chosen to keep the glaze just to the top of one of the boxes, the rest of the box and sides would have a light application of Copper Oxide. What I learned :-
   I had ended up with some lovely, interesting pieces of textured clay after my experiments for the Box of Secrets task which although I didn’t use, I felt it was a waste just to simply fire them as they were, so I chose to attempt to use them to create some small, platter like pieces which could perhaps be part of the body of work for my visions of landscape exhibition. I added feet to a couple of them and put them in the bisque firing before adding oxides and glazes. All of these pieces ended up in the exhibition and they all sold which was great and really encouraged to think about creating more! |
AuthorStella Boothman Archives
February 2024
Categories |


 RSS Feed
