|
I am a member of the Northern Potters Association and applied to exhibit in a group show alongside the Cumbrian Sculptors Association, the exhibition would be taking place at The Storey Gallery in Lancaster. I wanted to submit work that was based on my interest in the textures, colours and forms that occur naturally in the landscape. I chose to use some of the skills and techniques I had begun to explore on this MA in these pieces. I had also started to look at the work of Patricia Shone after coming across a YouTube video which gave a glimpse of her making process. Shone uses some remarkable textured surfaces in her work and I was interested in looking at ways to create interesting surfaces of my own. I invested in some wooden tools to help me manipulate the clay, I ended up doping some rather random google searches to try and find some tools that I thought would do the job, finishing up with a wooden ball potato masher, a muddler, a stone carving mallet and a porridge spurtle! I chose to use a heavily grogged crank clay body to make these pieces, I stretched out the bowl shapes from a solid block of clay, I used a wooden bowl and foam to support the clay ball as I inserted wooden tools into the centre and slowly pushed and stretched the clay outwards to form a bowl shape. I then heavily scored the exterior surface using the side of a metal ruler, a needle tool and a hack saw blade, applying a heat gun to this scored surface and stretching further to create a broken split surfaced texture. In the top images of the bowl shaped vessel I chose to use white slip and sodium silicate which I dried off with a heat gun, pushing out the clay from the inside in a similar style to Shone’s technique, I applied copper oxide wash to the exterior surface and a commercial crystal glaze and bronze glaze to the interior. I will be putting all of these pieces into the exhibition as well as some other works I have yet to complete. I repeated the process below with a red iron oxide wash but felt that the form had slumped too much and the shape was less pleasing as a consequence. There is a commercial glaze inside the piece. I repeated the techniques again with this next piece, this time without any white slip, just the sodium silicate and the application of a Black Iron Oxide wash after bisque which dripped on the inside and outside of the vessel. There is a commerical glaze on in the interior surface. I have had a lot of experience in working with plaster as I used it as a primary material for making work on my BA in Fine Art. I have also made a number of moulds since I started my own ceramics studio practice. These have included, two part press moulds, slump moulds, hump moulds and I have also made sprig moulds and slip casting moulds. Below are some images of moulds I have made and used since starting on the MA. I am planning to make some more large scale hemisphere slump moulds to enable me to create larger curved forms in the future. I am always on the look for items that can be used as the ‘pattern’ for the mould, anything from ping pong balls to exercise balls, rice containers, old crockery items etc. I use mould makers soap as a release agent and utilise offcuts of lino, stiff plastic or containers with their bases removed to act as a cottle (wall) to retain the plaster. I ensure all seems and joins are sealed with thin layer of soft clay as plaster can seep through the tinies of gaps and escape. I ensure that the ratio of plaster to water is sufficient, I usually use the ‘island’ method of sprinkling plaster into water, but have also used weight and volume ratios too. When pouring I endeavour to minimise air bubbles as much as possible and for complex shapes I use a paint brush to ease the plaster gently into delicate areas. This task felt like a huge and really difficult question for me to answer, there are so many things that I think inform my work. I began by roughly mapping out all the things about me that have the potential to impact on and influence they way I think about, approach and produce my work. My immediate gut response was “I have no idea”! I embarked on the MA course to try and find my voice, to try and find out what am really interested in making, what I want to say and why. Once I really started to examine the different areas suggested in the brief and really reflect on what was happening it turned out to be a really interesting and important exercise and helped to get some answers to the questions I was seeking. What it has revealed so far is that it is a complex process with many layers to it. I need to revisit this again and again, it has the potential to be a useful tool in helping me to articulate where my work comes from and understand how it has evolved and devloped over time. Below is an image of the snapshot I did on the day the task was set. The bottom image is the incomplete, but more in-depth mind map, I think of it as a work in progress, and is something that is likely to continue to shift, change and evolve in the same way that I do. 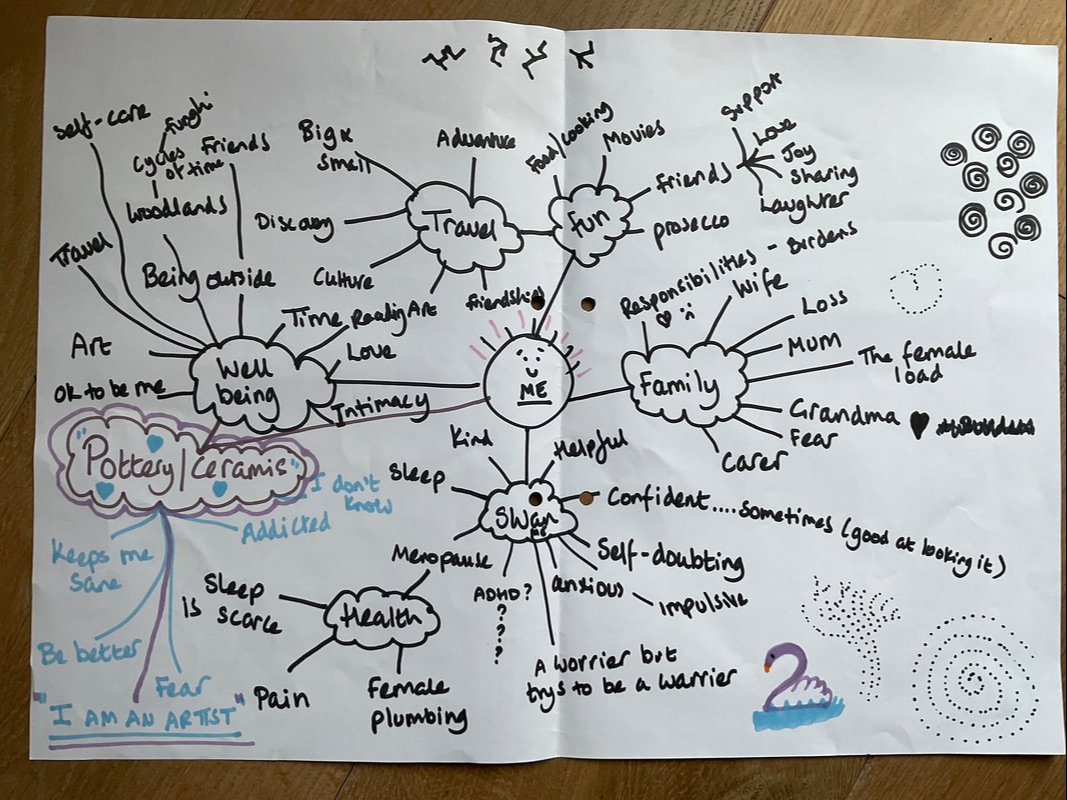  I had begun to make pieces ready for the Visions of Landscape Exhibition I was to be part of in April 2023, I knew I needed to build on the pieces I had made for the Shared Stories NPA exhibition, but that I needed to ensure it benefitted my MA work at the same time. I was still in love with coiling and couldn’t get texture and surface out of my head and as both of these fir so well with the overarching theme of Landscape for the show it just made sense to pursue this in as many ways as I could do, building on the things I had already done on my MA to date. I have never had the opportunity to do any reduction firing before so wanted to take the opportunity to do this for a piece for the show. I began making this coiled vessel in my studio, I used a heavily grogged crank clay body which coils beautifully and because of the addition of lots of molochite it lends itself well to creating large shapes in a relatively short amount of time. I began the coiled vessel in a plaster former that I had made using a solid hemisphere as a pattern, I then continued to build this once the base had set up, once released from the former the external surface could can be smoothed using a serrated rib and a rubber rib in combination. I took the piece to Uni to finish of and refine, then it went in a standard bisque firing. I used a range of house glazes, placing the piece on a banding wheel in the sink and smearing and pouring a combination of white, mottled green, Temmoku and shino glazes on the piece. I also applied some copper oxide wash. The results were both exciting and unexpected, reduction firing is all about the balance of heat and oxygen in the kiln chamber, where the oxygen level is restricted through increasing heat levels and restricting air intake by controlling vent openings the flames look for oxygen present in both the clay body and glaze materials, this reaction creates really interesting colours, tones and effects both in the surface of the clay body and in the glaze itself. A gas reduction firing would normally reach cone 10 around 1310 Deg C. It certainly makes some of the glazes darker, the Temmoku was a vivid red browm and a lot of the titanium white glaze seemed to disappear, though there are some lovely sections where you can see the reaction of the white with the clay body, the high grog content in this clay created a speckled effect in reaction with the white. The oxide was perhaps a little too heavily applied here, reduction firing will return the oxide back to it’s metallic state and this can be seen in aeas on this jar. What I learned/Next Steps:-
Update **** This piece is now sold, this piece was sold at the Visions of Landscape Exhibition in April 2023 I love slip decoration, it’s a great way to add texture, colour and interest to the surface of a pot without relying on a coloured or reactive glaze. Slip decoration is a very traditional method of decoration, and in truth am not a huge fan of some of the older slipware that was produced extensively in the 60’s, 70’s & 80’s. My main interest was sparked in April 2022 when I attended a course at The Sculpture Lounge in Holmfirth delivered by artists James Oughtibridge & Rebecca Appleby. Rebecca focussed on creating interesting surfaces in clay and demonstrated techniques using layers of slip, similar to those utilised by Lesley McInally. Below are some images of the textures I produced during that course using slip In August of this year I did an online course with Scottish born Canadian artist Lesley McInally, Lesley is known for her complex, layered slip decoration where she uses a range of techniques to create textured, brightly coloured and interesting surfaces on her ceramic vessels. I have attached som images below of her work. I created test tiles using the departments house stoneware clay body, I added coloured slips in a variety of different ways. I produced 3 sets of 5 tiles and used marbling, sgraffito, monoprinting (layering the slips), paper resist and painterly drip work to add effects to each, see below pictures. These tiles will be bisque fired initially and then used to explore the effects of clear glaze, coloured glaze and oxides, and I will blog about this later. I do have some experience in creating slab built ceramics, unfortunately the piece I made in response to this task did not survive, so I have no images of this task to demonstrate here. However slab building techniques were utilised in two other projects, Stand and Deliver & Box of Secrets tasks. Below are examples of work I have made using slabs as part of the construction process. Slabs are a fantastic way to construct ceramic forms, below you can see examples of using a slab over a form to create a specific shape. The cone of clay was achieved using a polystyrene cone as a former, the clay is wrapped around the former to create the shape. Flat slabs are used to slump both over into different forms to create shallow bowl like vessels. Managing the moisture content in the clay body is a crucial aspect to understanding the technicalities involved in slab construction. Slab vessels, boxes and sculptures that are constructed without the use of additional former support must be firm enough to hold their shape and withstand being physically manipulated without slumping or losing their intended form. Slab building hasn’t been an area of ceramic construction that I have utilised regularly, I think that this primarily due to the fact that it is generally used to create more angular, architectural type ceramic works. I have enjoyed constructing with soft slabs, however this has generally in the creation of cylindrical vessels such as vases and mugs. I am interested in using slabs to create spherical forms in conjunction with plaster formers, as slab formed sculptures are constructed from larger, single pieces of clay, they can offer good foundational strength to larger scale ceramics. Slabs can also be utilised to create internal support systems to offer strength and rigidity to wide and large ceramic pieces, |
AuthorStella Boothman Archives
February 2024
Categories |


 RSS Feed
