|
After the breakages and disasters of the last firing, I decided to scale everything back. I still liked the form of the ellipse piece's so decided to construct a couple of smaller versions of that one with a view to adding some surface interest and texture, as well as some of the special effects glaze I had been experimenting with. Below are images of the two pieces I made both in smooth black clay, one one I have used a lichen glaze, and on the other I have used a coloured porcelain slip I made to add a series of small dots to the surface. 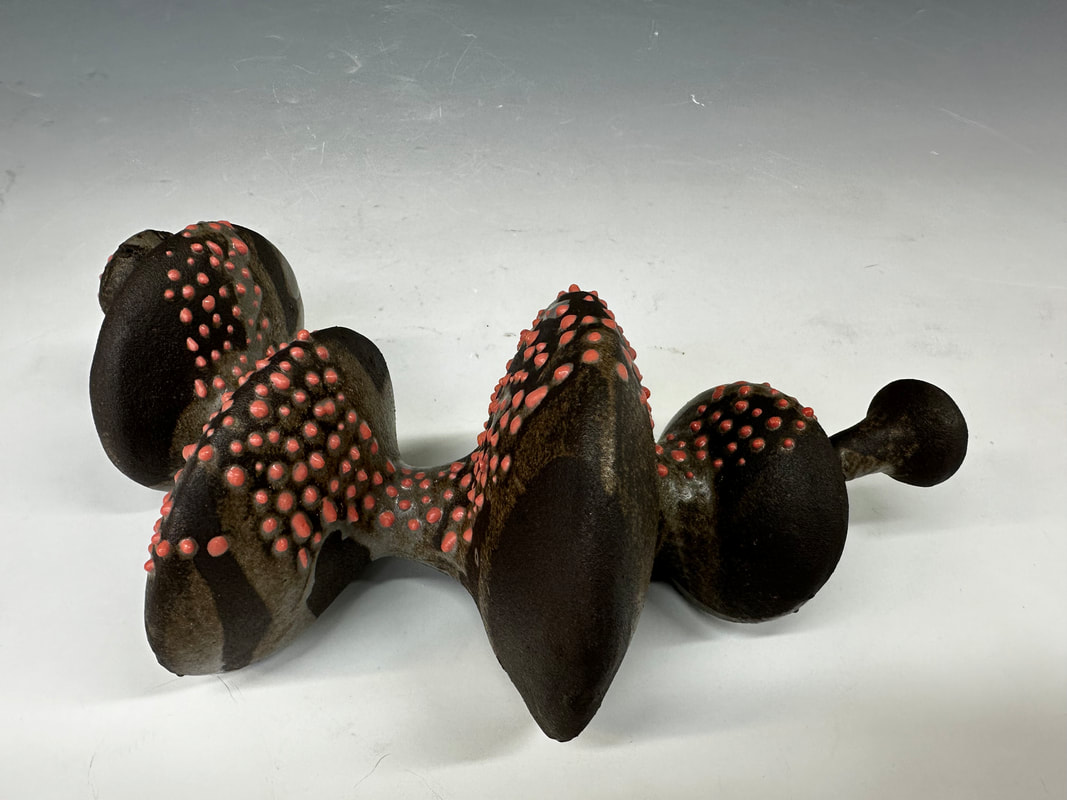 I was really pleased with how the piece looked with the dots, it created a really interesting surface to the piece, however I was disappointed to see how the house stoneware clear had reacted on the clay body. It does add another layer of interest in the way it has clouded, but although I could blag that this was the case it wasn't intentional. I would like to look at how to either add to slip to enable it to have better adhesion, perhaps adding gum arabic/cmc? Or look for a glaze that can remain raised from the surface whilst retaining a shine as I like the idea of matte and shiny together in one piece. Below are more images of this piece The piece below is another version of the black ellipse sculpture but this time I have added a lichen glaze to parts of the piece and also used some surface textured that I had developed in some smaller discreet pieces that I had been experimenting with (these have been blogged about separately). 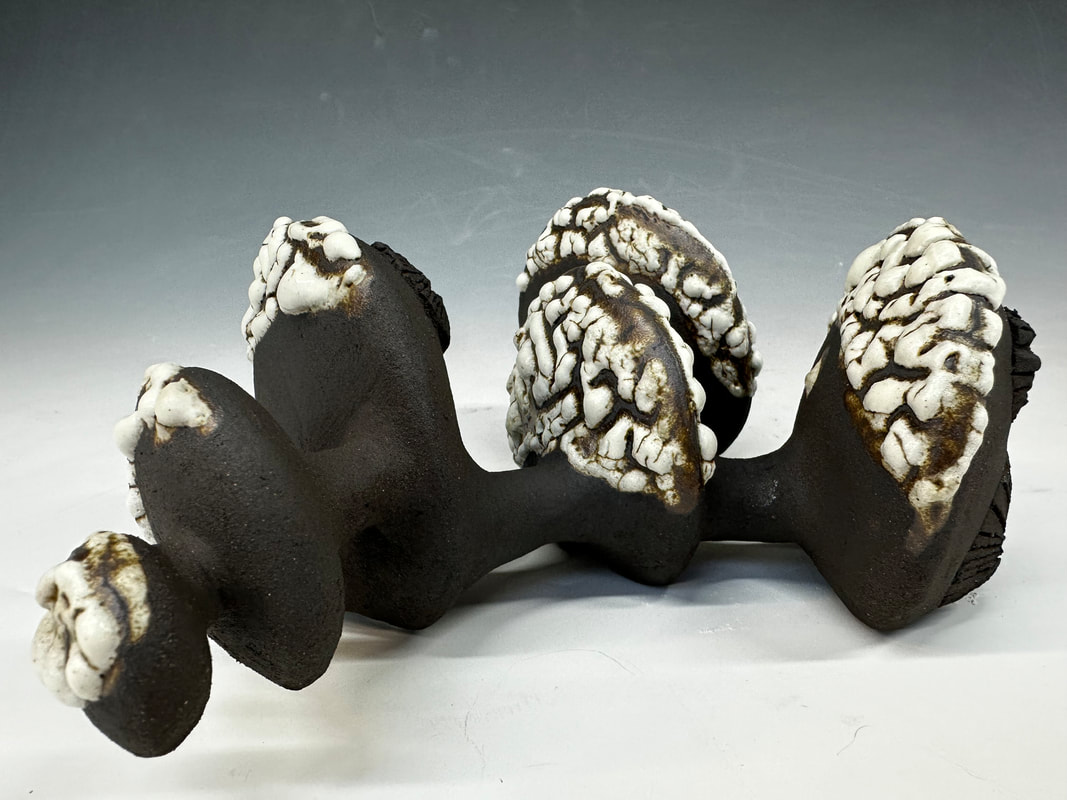 It was so nice and such a relief to have some successful pieces after a less than auspicious start to the new module. I knew that I had become bogged down by focussing on making complete pieces and this been hampered both by scale and by how I had been feeling. I started to really enjoy my clay journey again at this stage. I used the recipes found in Linda Bloomfield's Special Effects Glazes book. I had previously used a Marilee Lava glaze with mixed results, so chose Matt Katz Zinc crawl base and Linda Bloomfield's Magnesium Carbonate based Lichen Glaze, both reacted really well with the black clay.  I was pleased with the results of testing these recipes and decided that the next steps would be to add the lichen glaze to a smaller sculpture and to add further stains and colours to a fresh batch of this glaze and apply to a white clay body as the 10g of orange stain I had added to a separate batch disappeared on this test. Although I felt this was more likely to be due to the high manganese content of the black clay as it is notorious for just swallowing up colour, I needed to test further on other clay bodies to see how colour responded in the lichen glaze recipe.
Rob has been trying to encourage me to explore different surface textures and develop some special effects type glazes that can work with the forms. The aim of making these small maquettes is to develop ideas that could potentially be incorporated into some larger pieces. I still had some concerns that this may develop into pieces that became cartoon like versions of fungal forms or could look too literal but I was open to trying and am glad that I did as the process was really enjoyable and some interesting things emerged. 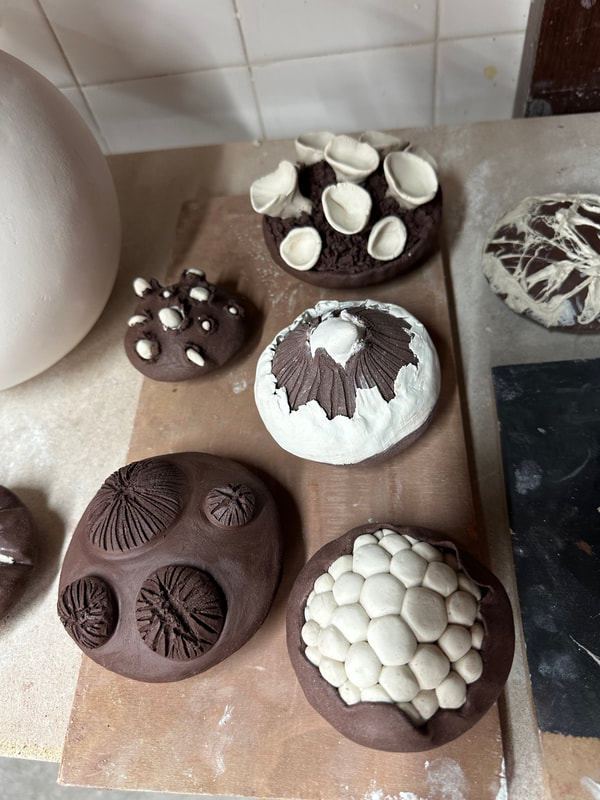 It was interesting to see what I could do by adding to, piercing and marking the clay whilst still working within the parameters of the ellipse form, some felt more successful than others and it led to the development of other ideas. In the above examples you can see that I have also combined two different types of clay a smooth black stoneware body and a basic porcelain body. I like the contrast of both the tones and the materials. Contamination of colour was a challenge and weight of some of the additions would certainly be an issue that would need further consideration should some of these be scaled up and incorporated into a sculptural piece. I am hoping that some of these can be developed as small versions of my bigger forms, individual works that can become pieces of sculpture in their own right. Using porcelain slip, am looking at ways to create finer surface structures that suggest sections from a mycelial network of hyphae. Using clay to create fine delicate structures is really challenging and I have a long way to go if I wish to pursue this in a meaningful way. As I was playing around with the different things that could be used, it made me wonder if I could consider using some non-ceramic material that would work with the sculptural forms. This is the seed of an idea and I haven't explored it further as to how realistic or practical it is to do. For these forms I used cotton wool fibres and wool rovings dipped in porcelain slip and then stretched over the surface of the ellipse. I continued this experimentation with organic materials dipped into slip on a larger piece where I used cotton thread and orange stained porcelain slip.   I had fully expected to come into Uni and find my white piece in bits, to my amazement it was intact!!! 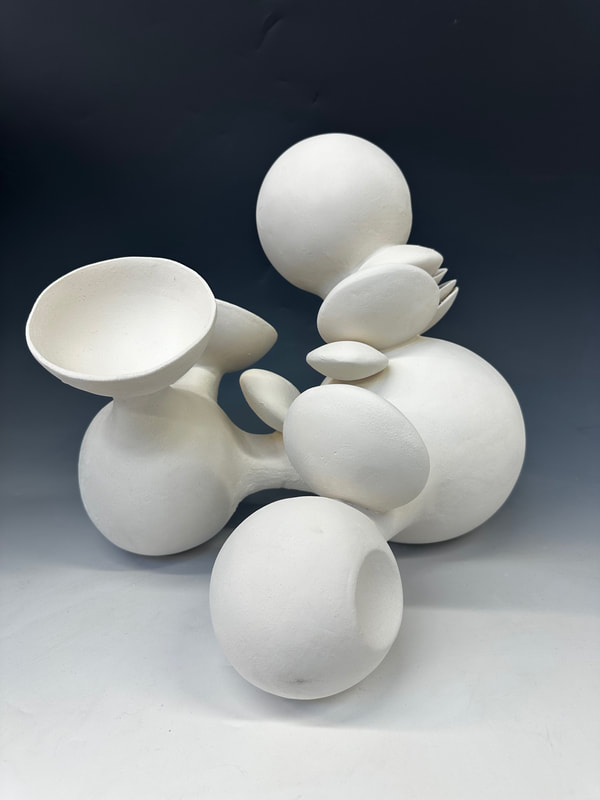 Amazingly it did hold, though there were a number of surface imperfections which was disappointing. I did feel reasonably pleased with the overall look of the piece, but it still wasn't fully working for me, it didn't flow, felt somehow very heavy to look at and perhaps too 'stiff' in its aesthetic. However! the black piece I had felt so much more confident about was a different story, it came out broken, with halves of ellipses sheared off and with cracks in the joins. I couldn't understand what had happened as I was confident that the joins were good and the construction was sound, there wasn't any off balance sections that would cause undue joint stress. What I realised had happened after taking some time to reflect was that it was likely down to inadequate drying inside the hollow forms due to a lack of holes being made in the different sections of the piece. It was such a basic error, I felt that it was a reflection of where my head has been at and how I have been feeling, struggling with focus, attention and concentration more than I would like. I was also surprised at my reaction, I would normally have been upset when something like this happened (at least in the short term) but I just couldn't find the energy or emotion to react to this in the way I would have expected. I had a tutorial with Rob and we discussed what had happened and how I was feeling and I have decided to seek some support. Rob suggested that I use the pieces as glaze test pieces to experiment with some glaze finishes as I had reached a point where I wanted to explore this. Below are images of the broken piece and one of the piece before firing for comparison. This is smooth black clay from valentines and will go darker after a higher stoneware firing. Both pieces where scheduled to be fired on 17th November, however the large piece broke in two at the centre joining branch between the two main halves of the sculpture due to a mishap whilst it was being loaded into the kiln. This also resulted in some of the smaller disc pieces falling off which I chose to leave off as I was so fed up with the fact that the piece had broken I couldn't face faffing about trying to re-attach them. Ultimately it was my fault that this had happened, despite me building the piece directly onto a kiln shelf to reduce the amount of handling it would encounter, I hadn't placed enough temporary support props around the piece to support it during the firing and one tiny error during handling caused a massive break to occur. I repaired the join by soaking the ends of the join in vinegar and made a vinegar and paper slip from the clay body, I then used this to repair the join. I wasn't convinced it was going to work and I nearly recycled the piece. Below are the images of where the piece broke and the subsequent repair. Below the pieces in the kiln ready for firing, a further prop was placed under the ball at the front. You can see in the image where I placed wax resist on the rims of the thinner hemispheres to slow down drying. The small clay wedges were providing stability and stopping the piece from making any wobbling movements whilst it was being moved. 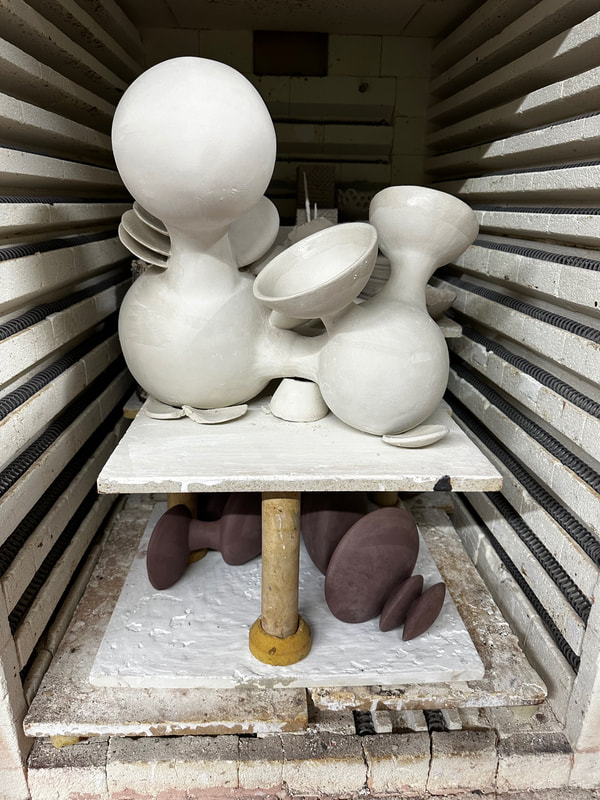 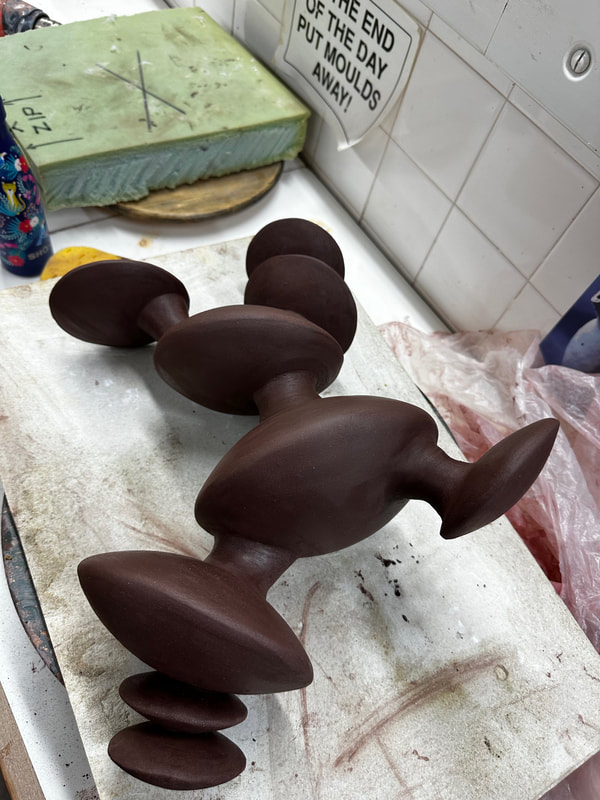 I enjoyed the construction of this piece so much more, it was simpler in terms of the components used and the overall balance of the finished shape felt like it flowed so much more than the bulkier white one. I was still determined that I needed to avoid adding a fussy surface to the piece despite suggestions from Rob to develop some glazes. Both the black and white piece should be dry enough to be fired in a couple of weeks. I was still struggling with focus and decision making about the piece, I felt really unsure about what to do and was struggling with concentration (it was at this point that realised that something else may be going on). I assembled the components of the white piece, it was challenging as lots of areas needed to be supported, I hadn't fully resolved how I was going to balance the piece and this ended up causing me issues later on. I know I should have probably drawn out a plan of how I envisaged it would look, or at least attempt to design a mock up of the components just as simple shapes and what they would look like, I know that if I had done all of that I would have doubtless made my life much easier. I just couldn't think my way through how to do this, I don't sketch out my ideas before hand, i never have. I am a poor draughtsman and have absolutely no confidence in my drawing skills, I hate showing anything I have drawn and the whole style of think & see, followed by sketching then making is just alien to me and massively re-enforces the feelings of self doubt and imposter syndrome I carry with me. In terms of the practical elements of the construction I knew that by using sponges, clay wads and kiln props I could support the various elements at greenware stage and throughout drying. The larger pieces joined well but the smaller, disc elements were much more challenging to attach. I really struggled to get the surfaces smooth between and around the joining points and this was very frustrating, it made me realise why ceramic artists adapt and make their own specialist tools and this was something I would definitely consider to help with sculpting pieces in the future. Scaling up comes with specific challenges, how to support a piece during making, how to manage the moisture levels in the different component parts, how to manage the ovoids to ensure air escapes and proper drying occurs, I used some larger plaster formers to make the bottom sections, I then chose to mix up a combination of elements incorporating ellipse forms, spheres, hemispheres and discs. I wanted to use a white clay body for this piece so chose to use Ashraf Hanna as it has a lovely white colour when fired and is a grogged stoneware so would be more forgiving when forming the larger elements. I used a similar construction process for the components that I had made on my red piece, a made up a vinegar paper slip for the joints, used a potters wheel to create the collars/joining sections. I decided to cut out a circular section from one of the balls to create a concave space and reinserted the disc of clay to make the shape. The large spheres were constructed using two joined hemispheres, I then reinforce the join with a coil, and then use a technique called Dorodango - the Japanese art of polishing dirt, I used the open top of a circular glass jam jar to smooth and even out the surface. Ensuring the clay sphere is firm enough to handle and take the pressure, the glass jar is repeatedly rubbed over the sphere in a circular motion to remove raised areas and even out the surface. All the elements are then wrapped in plastic and stored on foam cushions to prevent them from flattening out. During this make I started to really doubt myself again, I was struggling to work out how to construct the piece and made all the components but they remained wrapped up and unassembled. I also started on a black piece as I wanted to make a sculpture that was a series of connected ellipse shapes rather than full spheres and hemispheres. I think I had realised that the larger scale of the white piece had some issues. I was at this stage still very focussed on a 'complete piece' and that the surface would remain pure white or black,
 I was really happy with the feedback from my assessment, but knew I needed to make a decision about what direction I should choose for the next period of my development. Coming into the second year marks the half way point and for me felt like I needed to really start to 'buckle down' and focus on a narrower area of practice. Some of the pieces from my last assessment had been more successful than others but the ideas and potential as starting points excited me and I was feeling really motivated.
After discussions with Rob I felt that my strongest piece and the piece I was most interested in was my funghal/cell like connected piece in red clay. I needed to explore what I could do with this style of making, using different clays, scaling work up and down to determine what that would do. |
AuthorStella Boothman Archives
February 2024
Categories |


 RSS Feed
